How to Take a Screenshot on Mac
This article describes steps to take screenshot on Mac Book, editing screenshot on Mac, changing default location of screenshot on Mac and Troubleshooting tips.
If you have recently arrived in the Mac world, you will have encountered a quite significant difference with Windows, and that is the way to take screenshots. In macOS, the way to capture your screen is quite different from the one we have on a PC, since there is no "Print Screen" key that we press and an image of the screen is saved on our clipboard. In macOS from our point of view it is much simpler and more versatile since we have a large number of functions to take screenshots or even record our screen through keyboard commands.
So you can make 'screenshots' in Mac OS
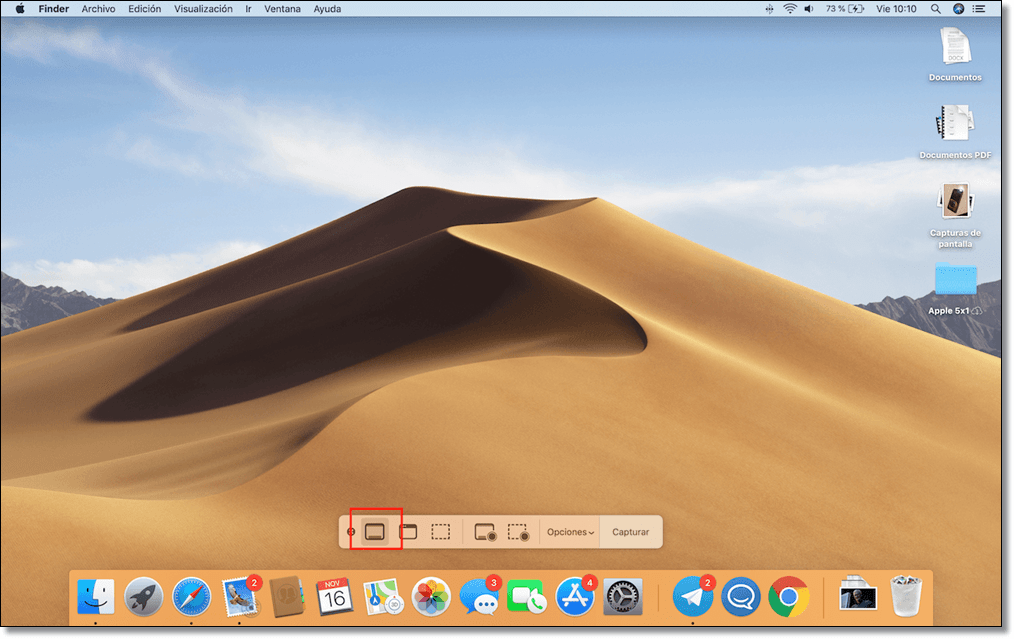
All possible ways to take screenshots on Mac OS are summarized by pressing Shift-Command (⌘) -5. By using this combination of keys we can see how a toolbar appears showing us all the possibilities we have and which we will summarize below.
Capture the entire Mac screen
If we want to take a screenshot of the entire Mac screen, we will simply have to use the keyboard combination Shift-Command (⌘) -3, and the screen capture will automatically be saved on the desktop or the default location in addition to showing a thumbnail in the lower right corner that we'll talk about later.
Capture the entire Mac screen
You can also do the capture through the toolbar that we have after pressing Shift-Command (⌘) -5. We will simply have to click on the icon that we indicated in the previous image and our pointer will automatically transform into a camera that when clicking on a screen will make the capture.
Capture only a selected part of the screen on Mac
If we want to take a screenshot of only a part of the screen we must press the Shift-Command (⌘) -4 keys. The cursor will become a crosshair that will allow us to make the selection that we want on our screen by clicking and dragging as we please.
If we make a mistake when selecting an area of the screen, we can press the space bar to move the selected area, the Shift key to modify the area horizontally or vertically and the Option key modifies the center area outwards.
Capture a specific window on Mac
If we do not want to take a screenshot of the entire screen of our Mac we can also capture a specific window such as our browser or another application. We will simply have to press Shift-Command (⌘) -4 and hold down the space bar, moving the cursor to a camera that we can place on the screen we want to capture and press to capture. If you don't like the window shadow that is generated, you can hold down the Option key when clicking.
In addition to being able to capture an application window, the same process can also be carried out to capture a menu or dialog box. Simply by hovering over it, it will stand out indicating that it is possible to capture it.
The Touch Bar can also be captured on Mac
If we want to capture the Touch Bar of the new MacBook Pro we simply have to press the key combination Shift-Command (⌘) -6. The file will be automatically saved on your desktop or in the default location.
Use a timer when taking screenshots on Mac
In macOS we have the option of taking screenshots using a 5 or 10 second timer. To be able to use it we can go to the Utilities capture and open the «Screenshots» application or press Shift-Command (⌘) -5. In the toolbar that will appear, click on "Options" and select 10 or 5 seconds, depending on how long we want it to take to make the screenshot.
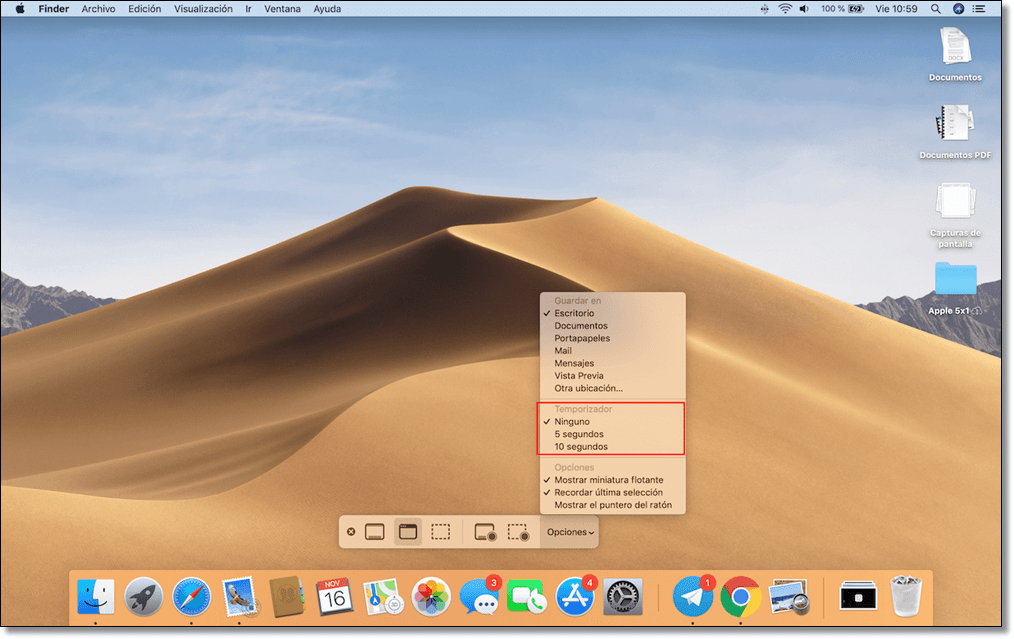
Use a timer when taking screenshots on Mac
As you can see, in this same menu we can also select whether or not we want the mouse pointer to appear , something useful if we want to point to any element of the image. We can also quickly select where we want the capture to be saved: desktop, downloads, mail ...
Edit the screenshot quickly on Mac
When we take a screenshot you will have noticed if you are in macOS that a thumbnail appears in the lower right corner. By clicking on it, we will have in our hand the possibility of making a quick edition with annotations. Once we have finished editing it, we can share it quickly through our messaging services or in Mail.
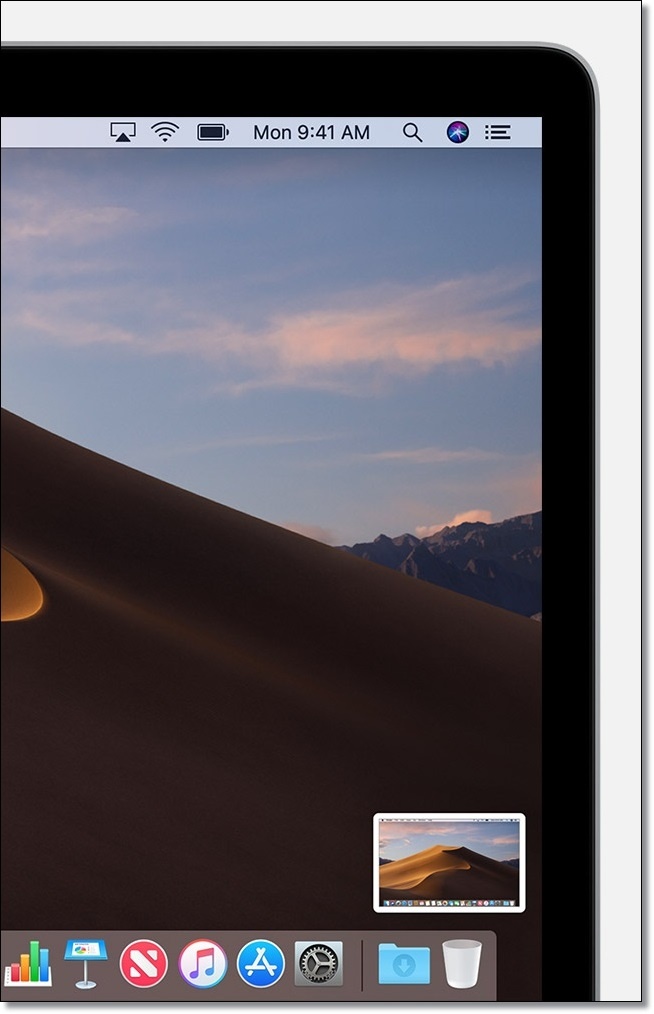
Edit the screenshot quickly on Mac
If we do not do any type of editing or slide the thumbnail to the right, it will be saved automatically, although if we open it and click on the trash can at the top we can delete it as in the iPhone.
Customize your screenshots in Mac
When we take a screenshot, the result file has a default name that is not too elegant, or a file format is also imposed that we can modify as detailed below.
Customize the name of your screenshots in Mac
If we do not want the word "screenshot" to appear in the file we obtain, we can use the following steps to modify it to our liking:
- Open terminal.
- Enter the command defaults write com.apple.screencapture name "Name" replacing what is inside the quotation marks with the name we want to give our screenshots.
- Enter the command killall SystemUIServer
We can also remove the date and time in the file name by following the steps below:
- Open Terminal
- Enter the command defaults write com.apple.screencapture "include-date" 0
- Enter the command killall SystemUIServer
- To go back we will simply have to repeat the same steps but modifying the "0" by a "1".
Customize the capture format in Mac
By default, the capture file will be saved in PNG format, but if we want them to be saved in another format we will simply have to open Terminal and enter the specific command for the format we want. Here are the different commands for each format:
- JPEG: defaults write com.apple.screencapture type jpg; killall SystemUIServer
- PDF: defaults write com.apple.screencapture type PDF; killall SystemUIServer
- PNG: defaults write com.apple.screencapture type png; killall SystemUIServer
- TIFF: defaults write com.apple.screencapture type tiff; killall SystemUIServer
- GIF: defaults write com.apple.screencapture type gif; killall SystemUIServer
Change save location in Mac
If we want to change the location where our screenshots are saved by default, we will simply have to open Terminal and follow the following steps:
- Enter the command defaults write com.apple.screencapture location ~ / Documents / NewFolder
- Run the killall SystemUIServer command
If we vary in the first command «Documents» and «NewFolder» you can customize where we want the files to be saved.
Getting used to this system is quite simple, although we understand that in the transition between Windows and Mac you may feel somewhat lost with routine functions, we hope we have made it clear with these steps how to take screenshot in macOS and of course, discover new customization commands, something that is not very common in the Apple ecosystem.
Screenshots on Mac - Problems and Solutions
Of course, errors do occur, also when trying to record the screen content of a Mac computer. This may be related to the program you are trying to capture. Apple recognizes, for example, that to protect works from indiscriminate copying, movie captures cannot be captured when viewed using a DVD player , even if the intended screen area does not play the movie or you are in possession of the rights to the tape.
However, it is possible to circumvent this limitation to capture images from a movie in two ways, always starting from the premise that copyright is not violated:
- Use an alternate player : Apple cannot prevent capturing images from a different movie and video playback program.
- Use a different capture program: This limitation only affects if you are using macOS or OS X applications, but there are other providers that offer free software to copy the screen of a Mac.