How To Tie A Tie Knot : 30 Ways To Tie A Knot (Steps in Images)
This article explains How to tie a tie knot, a step by step explanation with images as on Mirror. Learn 30 different ways to tie a tie knot.
Whether you're wearing your first tie, or you're into a challenge, our step-by-step guide will help you master 30 classic and popular knots.
Every knot, like the neck it surrounds, has a distinctive character and makes a different impression. The Van Wijk knot was created so that users could carry the knot as high as possible, while the Windsor knot is so formal that it is a favorite of the British Royal Air Force.
All you need to get started is a men's tie , a dress shirt, and a mirror. You also need our guides which of course you already have and patience, perseverance and determination. We do not know you personally, but we are sure that you possess these 3 virtues in large quantities! Washing your hands is also good in these cases and if your nails are too long, cut them so as not to damage the fabric of the tie.
We have made this step-by-step guide with instructions that are like the images in a mirror, that is, the drawing shows what you should see in front of the mirror.
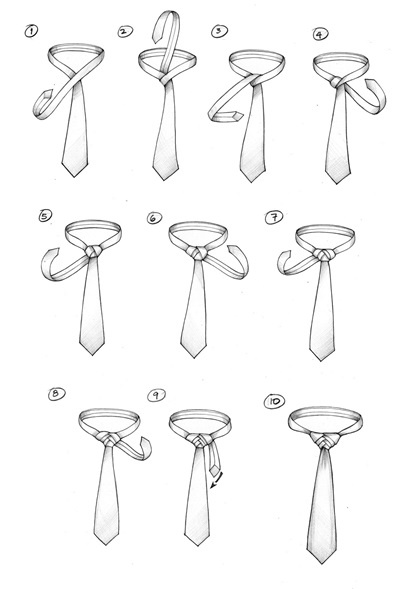
How To Tie A Tie : An Atlantic (Or Brown) Knot
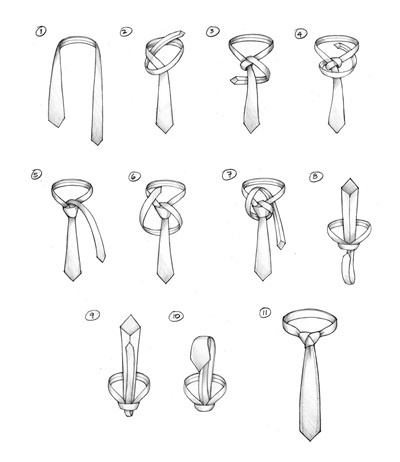
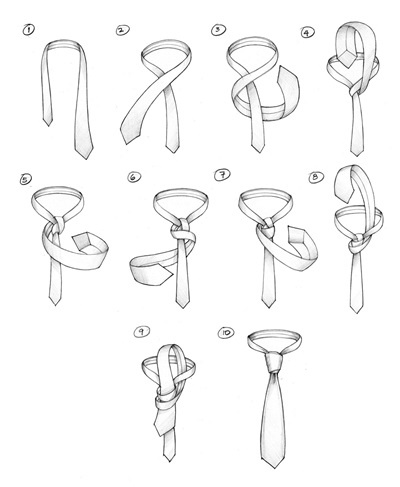
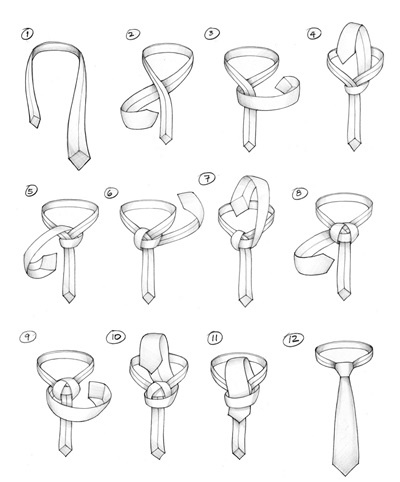
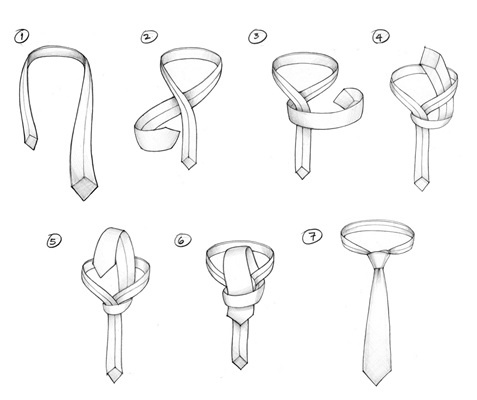
Steps To Tie A Tie : An Atlantic (Or Brown) Knot
- Start with the narrow end on the right.
- Pass the narrow end over the wide end and pull it up through the neck loop.
- Take it out on the right side and take it to the left.
- Now take it to the right through the front and pull it up inside the neck loop.
- Lower it above the knot so that it is hanging down.
- Move it a little to the right and then move it to the left passing behind the knot.
- Pull up the narrow end and tuck it through the neck loop behind the knot. It should appear to the right of the wide end.
- Pull the wide end up, hold it, and slip the narrow piece through the loop behind the knot.
- Pull the narrow end through the loop and tighten.
- Lower both ends.
- Hold the knot and carefully pull the wide end to tighten it.
On The Atlantic Knot
The Atlantic knot is the easy version of the Cape knot. It has a tendency to loosen during the day, but it is relatively easy to master and makes a great impression.
The Atlantic knot is also known as the Brown knot.
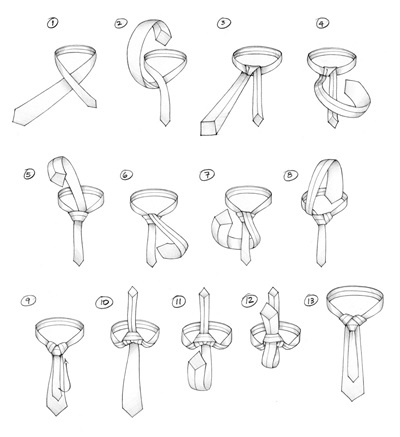
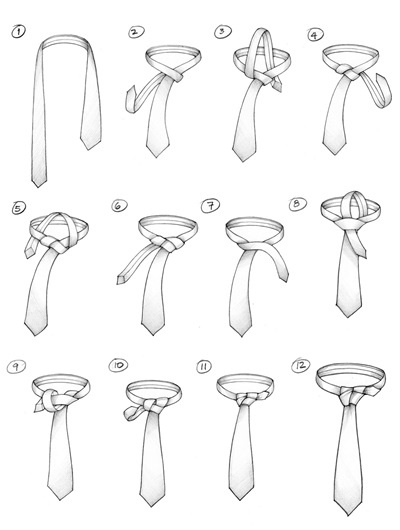
How To Tie A Tie : A Balthus Knot
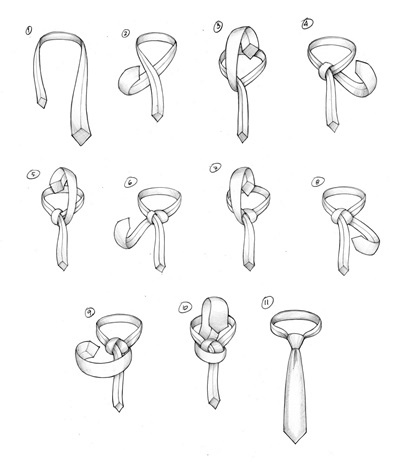
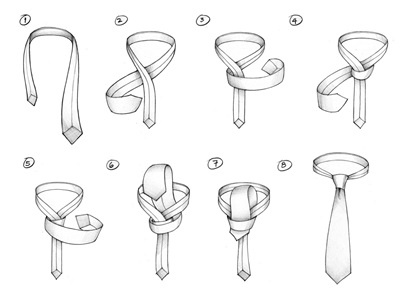
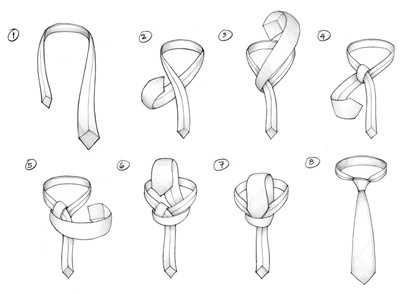
Steps To Tie A Balthus Knot
- Start with the back of the tie facing forward, the wide end on the right, and the narrow end on the left.
- Bring the wide end to the left passing under the narrow one.
- Pull the wide end up.
- Tuck it through the neck loop and pull it out to the left.
- Bring the wide end up as well and thread it through the neck loop.
- Pull it down and to the left.
- Pass it through the neck loop a third time.
- Take it out on the left side.
- Take it to the left by passing over the narrow end.
- Tuck it through the neck loop from the bottom up, then pull it back down inside the loop you just created.
- Pull the wide end down to tighten and bring the knot up to tighten.
About The Balthus Knot
The Balthus knot is attributed to the Polish-French artist Balthasar Klossowski de Rola. He succeeded in creating one of humanity's greatest knots. Well done, Balthus.
It's important that you start with the wide end hanging down, and keep in mind that the tie will be shorter when you're done.
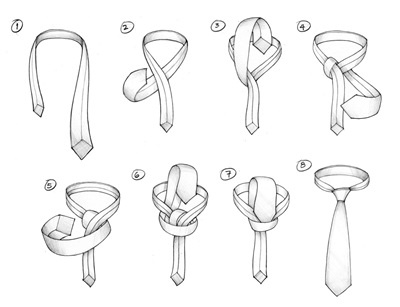
How to Tie A Tie : A CAPE KNOT
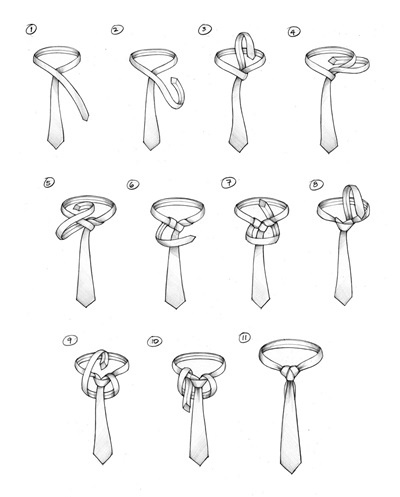
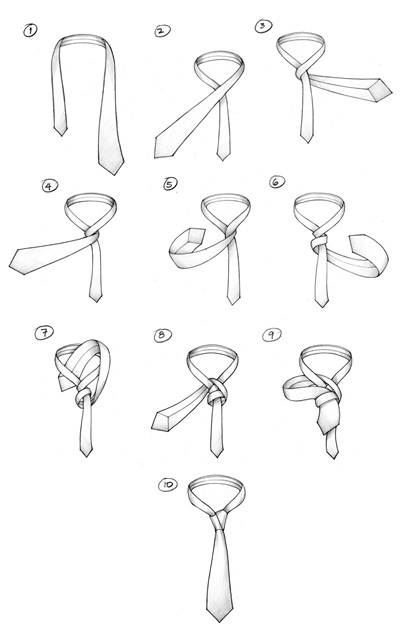
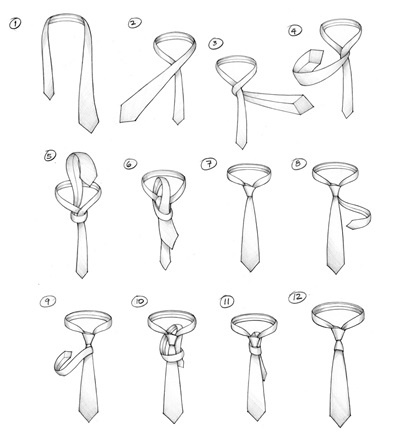
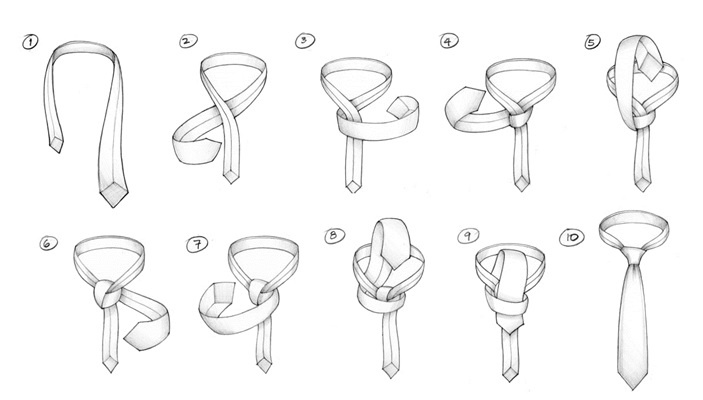
Steps to Tie a CAPE KNOT
- Start with the wide end on the right side and work the narrow end over it as you move it to the right.
- Bring the narrow end up and through the neck loop.
- Take it out of the loop and bring it to the right
- Tuck it back into the neck loop and bring it to the left.
- Pull it up and pass it through the loop again.
- Lower it and bring it to the left, passing in front of the knot.
- Bring it back and pass it through the loop on the right side.
- Pass it over the loop and bring it down on the right side.
- Pass it behind the wide end and bring it up.
- Tuck it inside the smallest loop.
- Put it behind the wide end and align both ends. Squeeze to adjust.
About The CAPE KNOT
The Cape knot is the advanced version of the Atlantic . This ends with the narrow end forming a cape-style structure behind the main knot.
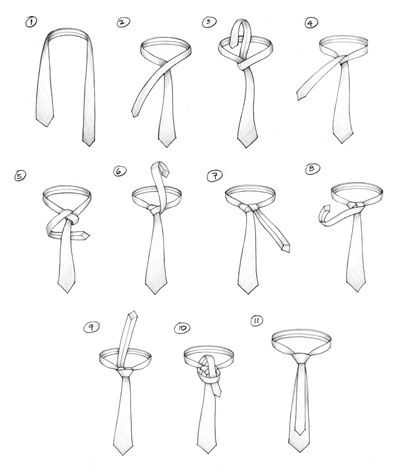
How to Tie A Tie : A CAVENDISH KNOT
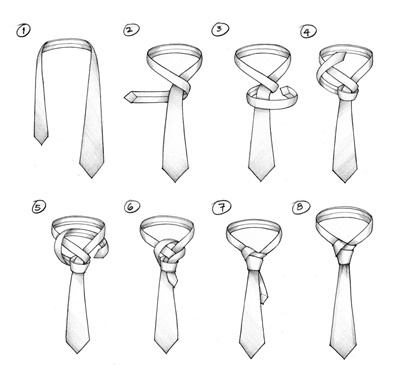
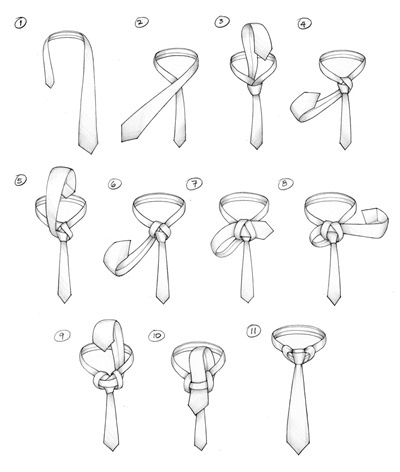
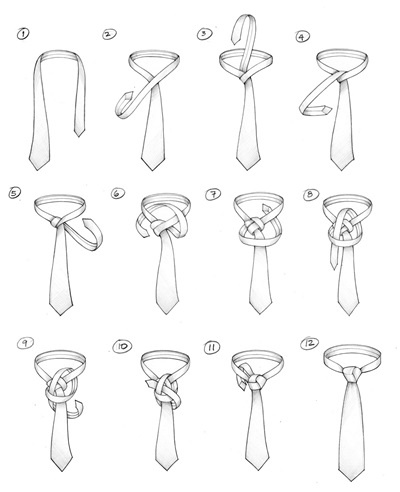
Steps to Tie a CAVENDISH KNOT
- Start with the wide end on the right side.
- Cross the wide end over the narrow end as you carry it to the left.
- Pass the wide end behind the narrow end and bring it to the right.
- Pass the wide end in front of the tie to the left.
- Bring it up and pass it through the neck loop.
- Bring it down and then to the left passing behind the knot.
- Surround the front of the knot with the wide end, then bring it up and through the loop.
- Lower the wide end and tuck it into the bow in front.
- Pull it tightly tight so you don't miss the dimple.
About The CAVENDISH KNOT
The Cavendish knot is named for the laboratory in which it was created. Two scientists put their brilliant minds to work together and brought this Windsor-style knot to life that works wonderfully with long ties. The laboratory is named after the British physicist and chemist Henry Cavendish . Henry never knew that the Cavendish knot existed. Life things.
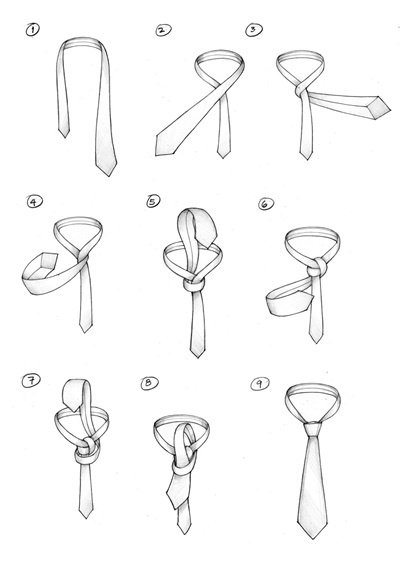
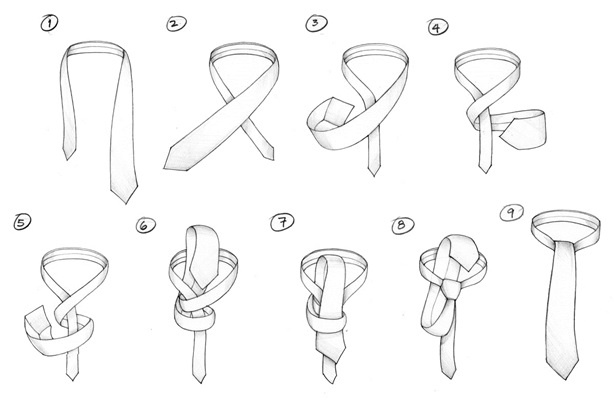
How to Tie A Tie : A CHRISTENSEN KNOT
Steps to Tie a CHRISTENSEN KNOT
- Start with the wide end on the right side.
- Bring the wide end to the left over the narrow end.
- Bring the wide end to the right past the narrow end.
- Pull up the wide end and thread it through the neck loop.
- Bring the wide end down and make it come out to the left of the narrow end.
- Surround the two bands that you created in the previous step with the wide end. Put a finger under this new crossing to hold it.
- Pass the wide end around the knot from left to right. Then bring it up, above the horizontal crease that you made in the previous step. Hold both bands with one finger.
- Bring the wide end up and through the loop.
- Tuck the wide end into the two bands and feed it down.
- To put the knot in place, hold it with one hand and carefully pull the narrow end. Use your finger to place the two pleats gently until the shape looks good.
About The CHRISTENSEN KNOT
The Christensen knot has the silhouette of an hourglass and requires a plain tie to do so, so leave the knit tie in the closet.
This knot first appeared in a Swedish mail catalog in 1917. It was republished again later and was given the name Christensen or cross knot.
How to Tie A Tie : A KNOT OF CROSSES
Steps to Tie a KNOT OF CROSSES
- Start with the wide end on the right.
- Pass the narrow end over the width from right to left.
- Bring the narrow end to the right.
- Now take it to the left, pull it up and tuck it inside the neck loop.
- Pull it out of the loop on the right side.
- Tuck the narrow end into the band you created in step 4.
- Gently feed the narrow end to the back of the tie. Take your time to make the knot as full as possible.
- Tighten and adjust.
About The KNOT OF CROSSES
The Crosses knot resembles the Diagonal and bears some relation to the Christensen , although its method of tying is different. Give them a try and tell us if you prefer this one or the Diagonal , its closest relative.
How to Tie A Tie : A DIAGONAL KNOT
Steps to Tie a DIAGONAL KNOT
- Start with the wide end on the right side.
- Pass the wide end over the narrow end to bring it to the left.
- Pass it behind the strait to take it to the right.
- Take it to the left again passing over the strait.
- Pass it to the right again.
- Bring the wide end up from the front.
- Tuck it inside the neck loop.
- Lower it on the left side.
- Tuck it into the band you created in steps 7 and 8 carefully.
- Tighten and adjust.
About The DIAGONAL KNOT
While the Diagonal knot does not have as many steps as other more complex knots, it is not easy to make or master either. Spend extra time in the final stages to get the knot in place.
This knot has received its apt name due to the diagonal line that is formed in the final steps. Once you've mastered the Diagonal, put your skill to the test with either the Eldredge or the Trinity .
How to Tie A Tie : AN ELDREDGE KNOT
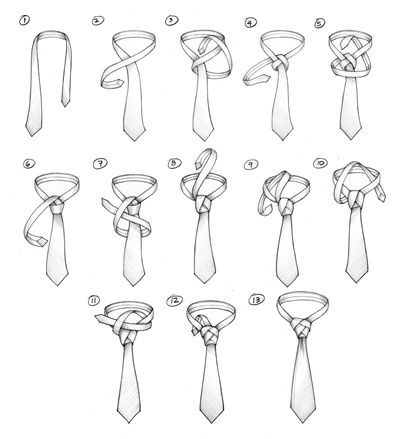
Steps to Tie an ELDREDGE KNOT
- Start with the wide end on the left. The tip should be above your belt buckle.
- Bring the narrow end to the left, past the wide end.
- Bring the narrow end to the right behind the wide end, then thread it through the neck loop.
- Lower it to the left.
- Take it to the right passing through the front. Then loop it from below.
- Lower it to the left and then pass it to the right behind the width.
- Bring it forward and pass it through the loop you created in step 6.
- Pull the narrow end up and towards the center to tighten it.
- Lower it and then take it to the left passing inside the loop.
- Pull it up towards the center, then tuck it into the loop and lower it to the right. Keep it loose.
- Bring it to the right going through the loop you created in step 10.
- Pull the narrow end to the left to tighten it.
- Tuck the remaining part of the narrow end into the back of the knot.
About The ELDREDGE KNOT
This knot was invented by a young man named Jeffrey Eldredge from Salt Lake City in Utah, United States, in 2007. He created this knot when he was looking for something that was as attractive as it was striking. It came out round.
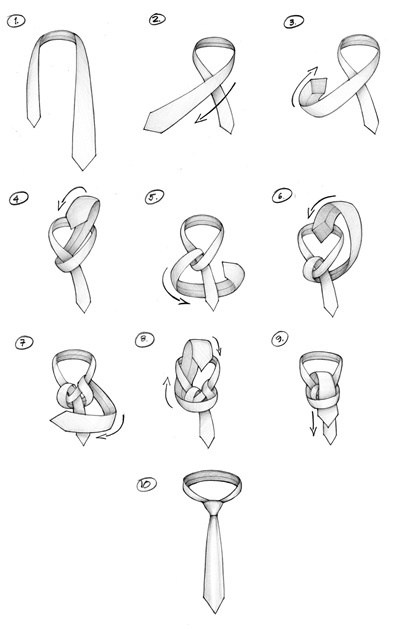
How to Tie A Tie : A FISHBONE KNOT
Steps to Tie a FISHBONE KNOT
- Start with the wide end on the left and cross the narrow above it to the left.
- Pull the narrow end up inside the loop.
- Lower it and take it to the left.
- Bring it to the right passing behind the knot.
- Tuck it into the loop from the front and pull it down to the left.
- Tuck it into the loop from the front and pull it down to the right.
- Tuck it into the loop from the front and pull it down to the left.
- Tuck it into the loop from the front and pull it down to the right.
- Squeeze the narrow end and tuck what is left of it inside your shirt behind the knot.
- Adjust as necessary.
About The FISHBONE KNOT
This somewhat complicated knot is so named because of the shape it represents. It resembles the Eldredge knot and the steps it requires are a bit repetitive. We recommend that you wear a single-colored tie, as patterns or stripes could show a somewhat odd appearance in the final knot. The Herringbone knot is quite large when you finish it, so use a large tie to do it.
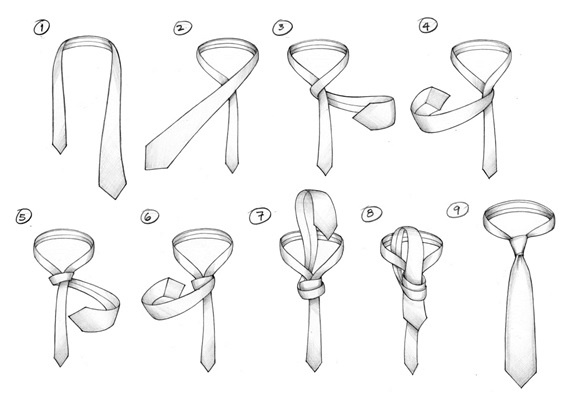
How to Tie A Tie : A FOUR-IN-HAND KNOT
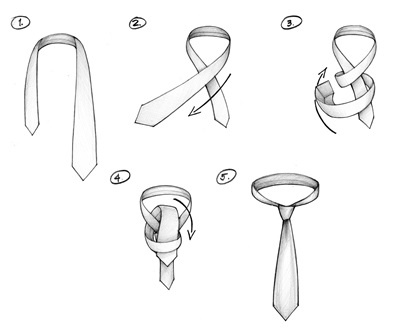
Steps to Tie a FOUR-IN-HAND KNOT
- Start with the wide end of your tie on the right (mirror image). It should be approximately 20 cm below the narrow.
- Circle the wide end over the narrow one once.
- Pull up the wide end and thread it through the loop around your neck.
- Hold the front of the knot so that it is loose and low and tuck the wide end into the bow.
- Tighten and pull the knot up
About The FOUR LOOPS KNOT
The Four-In-Hand knot resembles the Simple and is generally considered to be one of the easiest to learn and master. Its name comes from a famous London club, the "Four-In-Hand" and the coach who turned this knot into a massive fad.
How to Tie A Tie : A GRANTCHESTER KNOT
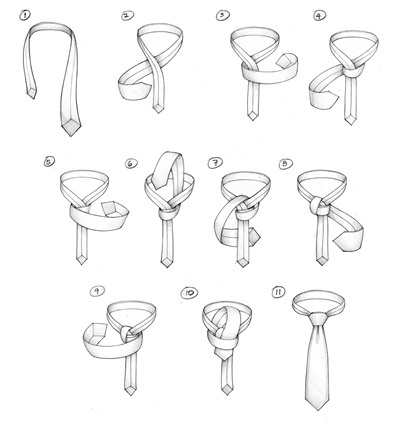
Steps to Tie a GRANTCHESTER KNOT
- Start with the wide end on the right with the liner facing out. Start 10-12 cm below your desired final position.
- Bring the wide end to the left by passing it under the narrow end.
- Bring the wide end to the right past the narrow end.
- Bring the wide end to the left by passing it behind the narrow end.
- Take it to the right as you go around the front. Use one finger to hold the band in place.
- Pull the wide end up inside the bow.
- Lower it to the left and out.
- Take it to the right by passing it behind the narrow end.
- Bring it to the left covering the knot with it. Use one finger to hold the band.
- Pass the wide end through the loop from behind, then lower it and tuck it inside the band you created in step 9.
- Pull it down and adjust it to a smooth shape.
About The GRANTCHESTER KNOT
We recommend that you use a very long tie to make the Grantchester, because a lot of fabric is needed. This knot has a fairly full look, so it favors large, broad-chested men.
How to Tie A Tie : A HALF WINDSOR KNOT
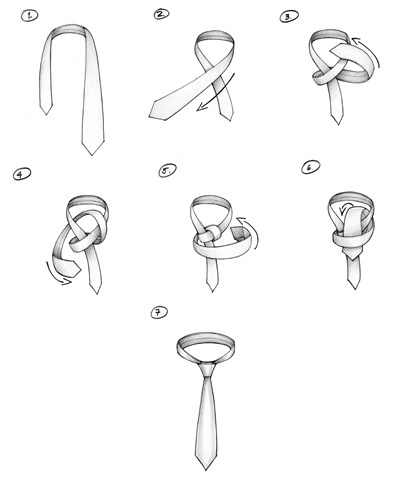
Steps to Tie a HALF WINDSOR KNOT
- Start with the wide end on the right. The wide end should be longer than the narrow end.
- Cross the wide end horizontally and in front to form an "X" under your chin.
- Now take it to the other side passing behind the strait.
- Pull it up, pass it through the neck loop, and pull it out the other side.
- Bring it to the right passing in front of the knot.
- Now pull it up and tuck it inside the neck loop. Then lower it and insert it inside the loop that has been formed in the front.
- Pull the wide end down to tighten the knot.
About The MIDDLE WINDSOR KNOT
The Half Windsor knot is a classic method with a balanced style that can be used for both formal and everyday situations. It is a great option for narrow ties because it gives them more room.
How to Tie A Tie : A HANNOVER KNOT
Steps to Tie a HANNOVER KNOT
- Start by placing the wide end to your right and with the lining facing out. Place this end about 10-12 cm below the position where you hope to finish.
- Bring the wide end to the left behind the narrow end.
- Pass the wide end in front of the narrow end as you bring it to the right.
- Pull up the wide end and thread it through the loop.
- Lower it to the left.
- Bring the wide end to the right behind the knot.
- Pull it up by going over the knot in the center.
- Lower it and take it to the left.
- Cross the wide end in front of the knot and bring it to the right. Use one finger to hold this bow slightly open.
- Pull up the wide end and thread it through the neck loop. Then lower it towards the center.
- Tuck the wide end into the bow you created in step 9.
- Pull it to tighten and adjust.
About The HANNOVER KNOT
The Hannover is a large knot that starts with the tie turned inside out and showing the lining, just like the Grantchester . The end result is a full knot that looks good in work and formal settings. We recommend that you wear a men's tie that is larger than usual to do it, since you have to use a lot of fabric.
How to Tie A Tie : A KELVIN KNOT
Steps to Tie a KELVIN KNOT
- Start with the wide end on the right and the seams facing out.
- Bring the wide end to the left below the narrow end.
- Pass it over the strait to bring it to the right.
- Take it to the left below the strait.
- Take it to the right passing over the strait.
- Pull it up and pass it inside the neck loop.
- Take it down and pass it through the loop you created in step 6.
- Gently pull the wide end to tighten it. Slide the knot up and tighten it.
About The KELVIN KNOT
The Kelvin knot looks similar to the Four Round knot , but starts with the seams facing outward, resulting in a slightly fuller knot at the end. It is named after the mathematician, physicist, and engineer William Thomson (Lord Kelvin).
An interesting fact, although not related to ties, is that Lord Kelvin is buried near the graves of Isaac Newton, John Herschel, and Charles Darwin in Westminster Abbey.
How to Tie A Tie : A KRASNY HOURGLASS KNOT
Steps to Tie a KRASNY HOURGLASS KNOT
- Start with the wide end of your tie on the right side.
- Bring the wide end to the left over the narrow end.
- Now take it to the right passing behind the strait.
- Take it to the left again.
- Pull up the wide end and thread it inside the neck knot.
- Download it and pass it through the band you created in step 4.
- Hold the narrow end and slide the knot up to tighten the knot.
- Bring the narrow end from the back to the right.
- Now bring it to the left passing over the wide end.
- Pass the narrow end behind the wide end (not through the neck loop) and tuck it inside itself as you lower it on the right side.
- As you pull on the narrow end to tighten the knot, carefully pull it up toward the first knot you made in step 7.
- If you are tall and the narrow end does not fit inside the loop at this step, the inventor of the Hourglass Krasny recommends that you wear a vest to hide it. Great advice that comes directly from the creator.
About The KRASNY HOURGLASS KNOT
Alex Krasny, an incredible tie expert, created this knot and named it "Hourglass" because of its shape, in addition to its name. The steps involved in this knot are similar to those of the Four Round knot (ending at Step 7). So if you are in a hurry, you can leave it there.
The Krasny Hourglass knot is subtle, although it gives a different touch to your tie that can come in handy on many occasions. Try to do it and see for yourself.
How to Tie A Tie : A LINWOOD TAURUS KNOT
Steps to Tie a LINWOOD TAURUS KNOT
- Start with the wide end on your right side. The wide tip should be much lower than the narrow one.
- Bring the wide end to the left over the narrow end.
- Pull it up and pass it through the neck loop.
- Lower it on the right side and bring it to the left passing behind the knot.
- Pull it up to the front and tuck it through the neck loop.
- Lower it and take it out from the right side.
- Tuck the wide end into the bands you created in steps 4 and 5.
- Pass the wide end behind the knot.
- Tuck it inside the neck knot.
- Download it and insert it into the band you created in step 8.
- The Linwood Taurus knot requires a bit more work at this step to properly position the folds and curves. Take your time and use a mirror.
About The LINWOOD TAURUS KNOT
The Linwood Taurus Knot is named for its creator, Linwood Darkis, and represents a bull with its horns. It is described as an aggressive knot because most bulls are not known for their gentle nature.
Tying a Linwood Taurus Knot requires a lot of fabric and patience, as it is not mastered in a short time. If you are late for an appointment, you better not go for this knot, even if you want to try something new. In that case you can opt for an Oriental knot and buy a watch and thus you will never be delayed again. Oh, and some flowers! So sure your date forgets your lateness.
How to Tie A Tie : A MEROVINGIAN KNOT
Steps to Tie a MEROVINGIAN KNOT
- Bring the wide end to the left below the narrow end.
- Make a loop and tuck the wide end into it.
- Pass it all the way through the loop and then pull it to the left.
- Pass it past the narrow end as you bring it to the right.
- Pull it up and pass it through the neck loop.
- Lower it above the center knot and bring it to the right.
- Pass it behind the narrow end and bring it to the left.
- Pull it up and through the neck loop from the left, past the narrow end.
- Go up the narrow end.
- (It should look like this).
- Raise the wide end.
- Keep pulling until it's tight.
- Bring it down to complete the knot and make any necessary adjustments.
About The MEROVINGIAN KNOT
Have you ever seen Matrix Reloaded ? The Merovingian (or French) is a character who brought the Ediety knot out of obscurity and made it fashionable again. Now this knot is called the Merovingian or Matrix in honor of the character. Anyone want a red pill?
If you don't want to look like a villain like the knot's namesake, choose a striped or light-colored tie. We recommend that you wear a vest over the Merovingian knot, because the ends of the tie do not line up.
"Have you ever had a dream, that seemed so real that you cannot distinguish it from reality? And if you couldn't wake up from that dream, how would you know that you are dreaming?" - Morpheus, something to ponder.
How to Tie A Tie : A MURRELL KNOT
Steps to Tie a MURRELL KNOT
- Start with the wide end on the left. The tip should be just below your belly button.
- Pass the narrow end over the wide end and bring it to the left.
- Pull it up and pass it inside the neck knot from behind.
- Lower it and take it to the left.
- Pass it behind the width and bring it to the right.
- Raise it towards the center.
- Lower it inside the neck loop and bring it to the right.
- Pass it in front of the knot and bring it to the left.
- Pull it up and pass it inside the neck knot from behind.
- Take it down and tuck it inside the knot you created in step 8.
- Pull on the narrow end to tighten the knot. Then slide the knot up and tighten it.
About The MURRELL KNOT
The Murrell knot is also known as the Reverse Windsor because the narrow end ends ahead of the wide (just like the Merovingian ). It was created by Brent Murrell in the late nineties and it is important that you take your time to tighten the knot at the end of the process, this way you will get the narrow part to be exactly in the center of your tie.
How to Tie A Tie : A NICKY KNOT
Steps to Tie a NICKY KNOT
- Start with the wide end on the right and the seams facing out.
- Cross the narrow end over the wide.
- Tuck the wide end into the neck loop.
- Take it out on the right side.
- Wrap the wide end around the front and pull it up inside the neck knot.
- Download it and tuck it into the band you created in step 5.
- Gently pull the wide end all the way through.
- Tighten and adjust.
About The NICKY KNOT
The Nicky knot is originally from Italy and became popular thanks to Ernesto Curami. It is a combination between the Victoria knot and the Cuatro Vueltas knot and you have to start doing it with the seams facing outwards.
How to Tie A Tie : AN ONASSIS KNOT
Steps to Tie an ONASSIS KNOT
- Start with the wide end on the right.
- Pass the wide end over the narrow end.
- Pass it behind the strait and take it to the right.
- Pass it in front of the strait and take it to the left.
- Pull it up and tuck it into the neck loop.
- Download it and tuck it into the band you created in step 5.
- Pass the entire wide end through it carefully.
- Bring the wide end up behind the knot and then drop it over it towards the front.
- Pull the wide end down and adjust it.
About The ONASSIS KNOT
The Onassis knot is named for Aristotle Onassis. He did not invent this style of wearing a tie, but it helped boost his popularity.
When finished, it is shaped like a scarf, since the widest part of the tie covers the knot. You can use it to highlight your favorite tie bar, or if you have a tie that you want to attract attention.
How to Tie A Tie : AN ORIENTAL (OR SIMPLE) KNOT
Steps to Tie an ORIENTAL (OR SIMPLE) KNOT
- Start with the wide end on the right and the seams facing out. The tip of the tie should be just above the belly button.
- Pass the wide end behind the narrow end and bring it to the left.
- Take it to the right passing over the strait.
- Pull it up and tuck it into the neck loop.
- Take it down and tuck it inside the little loop you created in step 4.
- Pull the wide end down to tighten.
- Slide the knot up to adjust it.
About The EASTERN KNOT
The Eastern knot is also known as the Simple or the Kent. It has very few steps and is considered to be the easiest to do, although, of course, that depends on your style of learning: maybe easy things seem difficult and you prefer astrophysics ... we do not.
While easy to learn, the Oriental — or Simple — knot has a tendency to lean to one side. This asymmetry may be annoying to some or a boon for lovers of world asymmetry.
How to Tie A Tie : A PLATTSBURGH KNOT

Steps to Tie a PLATTSBURGH KNOT
- Start with the wide end on the right and the seams facing out.
- Pass the wide end to the left under the narrow one.
- Pull up the wide end and tuck it inside the neck loop.
- Lower it and bring it to the right side.
- Pull the wide end up and tuck it inside the neck loop.
- Lower it and bring it to the left side.
- Bring the wide end to the right, passing over the left. Use one finger to hold this band.
- Pull up the wide end and thread it through the neck loop.
- Download it and tuck it into the band you created in step 7.
- Hold the knot and pull the narrow end to tighten it. Adjust the corners to match them.
About The PLATTSBURGH KNOT
This knot is named for the town of Plattsburgh in New York. It is a bit shorter than the Balthus .
For the best possible result, wear a long, thin tie, starting with the wide end well below the narrow end.
How to Tie A Tie : A PRATT (OR SHELBY) KNOT
Steps to Tie a PRATT (OR SHELBY) KNOT
- Start with the wide end on the right and the seams facing out.
- Bring the wide end to the left passing under the narrow.
- Raise it towards the center.
- Tuck it inside the neck loop and pull it out from the left side.
- Take it to the right passing in front of the narrow end.
- Pull it up and tuck it inside the neck loop.
- Lower the wide end and tuck it into the loop you created in step 5.
- Pull it to adjust it.
About The PRATT KNOT
The Pratt knot is also known by the names Shelby or Pratt-Shelby. Pratt is its creator and Shelby the man who made it popular. The story is this: In 1986, Jerry Pratt contacted Don Shelby (a TV host) to show him a better way to wear his tie. Shelby liked it, people saw it, it became popular and the rest you can imagine.
To tie the Pratt knot (or the Shelby, if you prefer), it is important that you start with the wide end below the narrow end. If not, the tie will be too short in the end ... and that doesn't look good on TV.
How to Tie A Tie : A PINK KNOT

Steps to Tie a PINK KNOT
- Start with the wide end on your left.
- Pass the narrow end over the wide end to bring it to the left.
- Pull it up inside the neck loop.
- Lower it to the right.
- Bring the narrow end to the left passing behind the knot.
- Now surround the knot with it while you pass it to the right and then pull it up inside the knot. Use one finger to hold this band loose.
- Lower it on the left side and then bring it to the right behind the wide end.
- Tuck the narrow end inside the loop you made in step 6 and pull it out to the left.
- Pass it over the neck loop and lower it to the left. Keep it loose.
- Tuck the narrow end into the neck loop through the inside of the band you created in step 9.
- Pull the narrow end to the right and carefully squeeze.
- Tuck the narrow end inside the collar of the shirt to hide it, and adjust the knot as necessary.
About The PINK KNOT
The Pink knot looks like the Trinity knot , but they are not tied in the same way. It is so named because the final shape looks like a rosebud. This knot is a great option for a first date and even better for a wedding. The knot of True Love and this one are the most romantic in the collection.
Since the pink knot is tied with the narrow end, start with the wide end positioned just where you want the tie to be last.
How to Tie A Tie : A SAINT ANDREW KNOT
Steps to Tie a SAINT ANDREW KNOT
- Start with the wide end on the right and the seams facing out.
- Bring the wide end to the left passing behind the narrow.
- Bring the wide end to the right passing in front of the narrow.
- Bring the wide end back to the left behind the narrow end.
- Pull it over the knot and tuck it inside the loop.
- Take it out on the right side.
- Bring it to the left in front of the knot. Use one finger to hold this band and keep it slightly open.
- Pull it up and tuck it into the loop.
- Download it and pass it through the band you created in step 7.
- Squeeze and adjust.
About The SAN ANDRES KNOT
Saint Andrew is the patron saint of Scotland, Barbados, Georgia, Ukraine, Russia, Greece, Cyprus, Romania, Patras, Burgundy, Saint Andrew (Tenerife), Amalfi, Luqa (Malta), fishermen, rope makers, textile workers, singers , miners, pregnant women, butchers and farm workers. This saint also protects against a sore throat, which is interesting considering that the Saint Andrew knot bears his name and wraps around your neck, which is the place where the throat is located. Awesome!
But the key to making a good San Andreas knot does not lie in your connection to Barbados, but in making the wide end much lower than the narrow end at the beginning. The final knot is slightly unbalanced. If you like symmetry, go for a Windsor knot .
How to Tie A Tie : A TRINITY KNOT
Steps to Tie a TRINITY KNOT
- Start with the wide end on the left. Its tip to be above the buckle of your belt.
- Bring the narrow end to the left passing over the wide.
- Pull it up inside the neck knot.
- Lower it to the left.
- Take it to the right behind the width.
- Pull it up and tuck it into the loop at the center, then lower it to the left.
- Bring it to the right passing in front of the width and tuck it inside the loop.
- Lower it and tuck it inside the loop you created in step 7. Keep it loose.
- Take it to the right passing behind the width.
- Bring it forward and tuck it inside the loop you created in step 9.
- Pull it carefully and tuck the remaining part of the narrow end behind the neck loop.
- Make any necessary adjustments.
ON THE KNOT OF THE TRINITY
We hope you have free time because the knot of the Trinity is not mastered in a moment. It resembles the Eldredge knot and attracts a lot of attention because it is difficult to do.
The knot is so named because it has a shape similar to that of the Celtic triquette. Christians adopted this symbol and connected its meaning with the Holy Trinity.
The Trinity Knot (also known as the Irish Love Knot) should be left a little loose when tying and tight when finished. It is also mandatory to start with the wide end right where you want it to end. This is because it does not move during the tying process.
How to Tie A TRUE LOVE KNOT (OR PINWHEEL)
Steps to Tie a TRUE LOVE (OR PINWHEEL) KNOT
- Start with the wide end on the left, roughly at the level of your belly button.
- Cross the narrow end over the wide end and bring it to the left.
- Tuck it into the neck loop from the front.
- Lower it to the right side.
- Pull it up and tuck it into the neck loop from the right.
- Lower it and take it out from the left side.
- Bring the narrow end to the right past the knot. Use one finger to hold the loose band.
- Pull it up, tuck it into the neck loop and then lower it and insert it into the band you created in step 7. Stop here if you want a Half Windsor with the narrow part in front.
- First, release the top of the narrow end (near your neck). You need it to be loose for the next steps. Then turn the tie and lift the narrow end over the neck loop. Pull it out to the right.
- Take the tip of the narrow end and tuck it into the loose band from step 9.
- Pull the wide and narrow ends carefully to adjust.
- The point of the narrow end is visible in the illustration, but it should be hidden under the collar of your shirt.
About The KNOT OF TRUE LOVE
The knot of True Love is also known as the Pinwheel. It is quite difficult and it takes practice to perfect it. For the best result, wear a very long tie, because a lot of fabric (like the Eldredge knot ) is needed . Or wear a standard tie with a vest to disguise that the tie is too short.
As with other unconventional knots, the narrow end is the active or moving end. The creator of this challenging knot is Elliot Truelove, who also gave it his own name.
How to Tie A Tie : A VAN WIJK KNOT

Steps to Tie a VAN WIJK KNOT
- Start with the wide end on the right and the end of the narrow just above the navel.
- Bring the wide end to the left over the narrow end.
- Now take it to the right under the strait.
- Take it again to the left in front of the strait.
- Take it to the right again behind the strait.
- Take it to the left again in front of the strait. Make this band slightly lower than the one you made in step 4.
- Take it to the left again.
- Pass him in the direction of the left again. Make this band slightly lower than the ones you made in steps 4 and 6.
- Pull up the wide end and tuck it into the neck loop from behind.
- Take it down and pass it through the three bands you created in steps 4, 6, and 8.
- Pull the wide end down to tighten. The first and second bands should be seen slightly below the third.
About The VAN WIJK KNOT
This knot is named after the name of its creator, Lisa Van Wijk. Rumor has it that she was trying to create the tallest knot in the world ... or at least one that looked tall, but elegant. The result is this cylindrical knot with an artistic air, but without excesses.
Make sure that the bands are a little loose, because the wide end has to pass through them without problems.
How to Tie A Tie : A VICTORIA KNOT
Steps to Tie a VICTORIA KNOT
- Start with the wide part on your right side.
- Take the wide end to the left passing in front of the narrow.
- Now take it to the right behind the strait.
- Take it to the left passing in front of the strait again.
- Take it back to the right.
- Take another turn to the left and use one finger to hold the band open.
- Pull it up and pass it inside the neck loop.
- Lower it and tuck it into the band at the front.
- Squeeze and adjust.
About The VICTORIA KNOT
This knot got its name from Queen Victoria. However, we have done a thorough research on your images on the internet and we can conclude that you probably never used this knot or any other type of knot for men's ties.
Many prefer this knot to its cousin - the Four Loops - because in the end the tie is neither too high nor too low. Speaking of short things ... here's an interesting fact: Queen Victoria was 5 feet tall.
How to Tie A Tie : A WINDSOR KNOT
Steps to Tie a WINDSOR KNOT
- Start with the wide end on your right hanging 12 cm below your belt.
- Cross the wide end horizontally and in front to form an "X" under your chin.
- Pull up the wide end and tuck it inside the loop around your neck.
- Lower it and pass it to the other side to its full extent.
- Bring it to the other side by going behind the knot.
- Tuck it inside the loop around your neck and lower it. You now have two ties: one on each side of the narrow end.
- Pass the wide end in front of the knot to form a band. Use one finger to hold it in place.
- Pull the wide end up from the bottom of the bow to your chin.
- Now pass it inside the front band (step 7).
- Pull the wide end all the way down and smooth out any wrinkles in the knot.
About The WINDSOR KNOT
The Windsor knot has many names: the Full Windsor, the Double Windsor, or the Scappino knot. The Duke of Windsor liked to wear very full knots and used very thick fabrics to achieve his trademark style. So the English, in an attempt to emulate the duke, created the Windsor knot. This acquires the same robustness as those used by the duke, but without the need to use very heavy and thick materials.
Members of the military often wear the Complete Windsor for its authority and dependability. The Windsor has a symmetrical and triangular finish and is best suited for men with thick collars and ties made from lightweight fabrics.
It is important to start with the wide end much lower than the narrow end because a lot of material is required to tie this knot.
QUESTIONS AND ANSWERS
WHAT IS THE BEST KNOT TO HIGHLIGHT A PIN OR TIE BAR?
The Onassis knot
WHAT IS THE BEST TIE KNOT TO USE WITH A SHIRT PIN?
Try the Four-In-Hand or the Half Windsor. Both allow the bar to be seen.
Check out the Four-In-Hand here and click here to see the Half Windsor.
WHAT IS THE EASIEST KNOT TO TIE?
The Oriental knot , also known as the Simple.
WHAT IS THE HARDEST TO DO?
The Eldredge is one of the most difficult knots to master, but the effort is worth it!
WHAT IS THE MOST COMMON TIE KNOT FOR A GROOM?
The Windsor or Half Windsor knot fits well with the formality of most weddings and is fairly easy to learn. If you are looking for something a little more romantic and eye-catching, try the Trinity knot or True Love knot .
If you need a little more inspiration for your wedding, read our definitive guide to groom accessories .
WHAT FABRIC SHOULD I USE TO GET THICKER KNOTS?
Take into account the inner lining of the tie. The thickest knots come out of the ties with the thickest lining and vice versa. Try making a Windsor knot or the Pratt if your tie is thin and a Four Loop if it is thick.